March 26, 2023: FreqEZ Band Decoder v2.2.0 released to general availability
Copyright
This software is copyrighted freeware. You can use, modify, and distribute the software provided that you offer it and any derivative works as freeware. Any commercial use must be approved in writing by the author.
Disclaimer
This software controls equipment that could be damaged by said software. You are responsible for installing, configuring, testing and ensuring that the software performs properly in your environment. The author cannot be held liable for any direct, indirect, consequential or incidental damages to other pieces of software, equipment, goods or persons arising from the use of this software. By downloading this software you accept the above terms of copyright and disclaimer.
Click HERE to read the announcement and instructions for existing users.
I. FreqEZ v2.2.0 Windows Console:
Standard Windows setup program:
Download and unzip this ZIP archive. Then run the setup executable:
- FreqEZ Windows Console: FreqEZ WinConsole_v2.2.0.zip
2. FreqEZ v2.2.0 Raspberry Pi Controller – Two methods:
Burn microSD Disk Method (RECOMMENDED):
A complete FreqEZ Controller software installation can be created using the Raspberry Pi organization’s Imager program ( https://www.raspberrypi.com/software/ ) to burn this image file to a microSD card. The resulting microSD will contain both the Raspbian operating system and pre-configured FreqEZ RPi software. When finished, just insert the microSD card into the RPI and apply power. Step-by-step instructions can be found below and in the “Raspberry Pi Controller – Preparing the microSD Card” section of the documentation by clicking on Help in the v2.2.0 Windows Console or opening the on-line Help file in >Downloads >Version 2.2.0 “FreqEZhelp.dbf”.
FreqEZ Installation Guide
- Raspberry Pi Imager – for creating the Raspbian operating system image to the microSD card. Follow instructions below
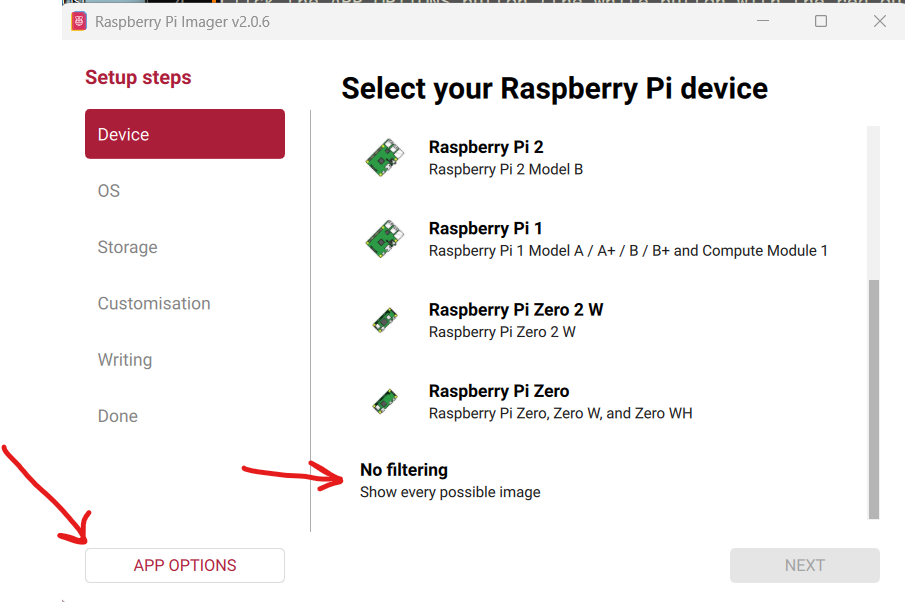
- Launch Raspberry Pi Imager
- Click the APP OPTIONS button at bottom of the window (the white button with the red outline)
- Under Content Repository choose Use custom URL
- enter: https://freqez.kk1l.com/imager.json
- press APPLY & RESTART
- Choose the Device Setup step (should be already selected on left)
- Scroll to the very bottom and double-click No filtering
(or select and press NEXT)
- Scroll to the very bottom and double-click No filtering
- Double-click FreqEZ Trixie Headless or Desktop at the top of the list
(or select and press NEXT) - Choose the storage device (microSD) to write
- For Customisation steps enter a hostname, locale, username, password, WiFi SSID, passphrase
- hostname of ezcontroller-1 is not a bad choice
- Leave “Capital city” as is…it does not matter
- username = ez, password=freqez is not a bad choice. Don’t choose “pi”
- ENABLE SSH!
- Proceed to write the image to your SD card
- The IMG file will be automatically downloaded and burnt to the micro SD card

This loads a “headless” version of 64bit Debian “Trixie”…Raspbian v13.3.
The first boot will take a few minutes. Each subsequent boot will be much quicker.
Manual File Copy Method (ALTERNATE):
The files in this FreqEZ RPi Controller ZIP archive can be downloaded and manually copied to specific locations within the Raspberry Pi file structure. Step-by-step instructions can be found in the “APPENDIX: Alternative Method for Preparing the microSD Card” section of the documentation by clicking on Help in the v2.2.0 Windows Console or opening the on-line Help file in >Downloads >Version 2.2.0 “FreqEZhelp.dbf”.
- FreqEZ Raspberry Pi Controller FOR BULLSEYE or earlier!!: FreqEZ2 Raspberry Pi Controller_v220
- FreqEZ Raspberry Pi ControllerFOR BOOKWORM or later!!:FreqEZ2 Raspberry Pi Controller_v230
FreqEZ v2.2.0 Help PDF file
- FreqEZ Documentation / Help file: FreqEZhelp.pdf